Auto Pages: 2002 BMW M3 (E46): Suspension

New Ground Control Suspension Install

After only driving the car for a few thousand miles, I knew I wanted new suspension.

I found the suspension would compress when entering a turn and then spring back when exiting, which was unsettling. It also just want' controlled enough to handle uneven surfaces. The Ground Control setup actually has more travel, just with much better, and adjustable, damping. The factory suspension only allows for about -1.0° camber, so I figured I'd get camber plates as well. Well, "In for a penny, in for a pound..."

My friend (also with a 2002 M3) and I discussed the available options at great length and both chose Ground Control. The equipment had a good reputation, looked very well-engineered, and offered the features we wanted. It also helped that Jay at Ground Control has an E46 M3 on which he developed the suspension and seemed to really understand our priorities and needs. We each ordered the same kits, though with slightly different spring rates. A friend of mine, Chris, owns Bauer Porsche in Oakland. He volunteered not only his shop (lifts, alignment rack, tools) but also his time. A mutual friend, Ken, also volunteered to help as needed. A most generous offer it was from them, as the installations dragged into the second day and well into the wee hours...


  Ground Control Suspension

We started around 2pm on Saturday. My friend wasn't there yet, so we started into may car, beginning at the rear. The equipment looked very well made and quite impressive. I organized things nearby.
Ground Control suspension parts 
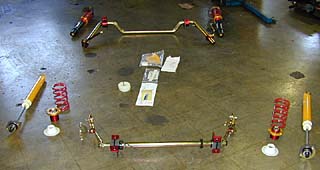
The entire setup, including front coilovers with camber plates, front bar, miscellaneous bits and rear-arm stability kit (middle), rear springs, rear struts, and rear bar.

I was immediately grateful for the lifts, which saved everyone's back muscles and made it so easy to get a good look at what we were doing. Having redundant tools, such as 13mm wrenches, also made installation easier. Removing the factory rear anti-sway bar was tricky. Since we needed to install the rear-arm stability kit, we loosened the rear arms first, which gave us more room. Too bad we didn't think of that before trying to drop the exhaust... Installing the kit was a piece of cake.
GC rear arm stability kit 
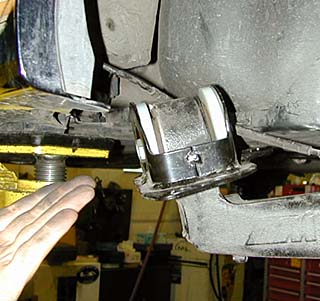
The rear-arm stability kit.

Getting the rear bar out was more tricky, though the next day my friend found that, by removing all the links first and not yet installing the struts, it was easier than our initial approach. We then got the rear bar in and adjusted. Stiffness is adjusted by selecting which of five bolt holes to use on each side, thereby allowing up to ten levels of stiffness. Removing the rear springs and struts and replacing them with the Ground Control gear was relatively simple. I was too distracted to get a shot of the rear bar installation.
GC Koni struts Eiback springs 
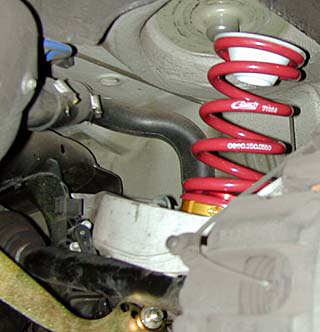
The rear springs. You've got to be sure the spring is properly seated so that it goes into place once the car is lowered.

Removing the factory front coilovers was a mess, because there wasn't enough room to get them out of the wheel wells. We decided to separate the front ball joints to get the necessary clearance, which involved using a ball-joint separator and a hammer. I let Chris to do this, confident that I'd smack a brake line or a fender. Around 8pm, we decided to call it a night and get to it around 11am the following day. Yeah, right.

By 2pm on Sunday, we were back at the shop, bellies full of eggs benedict to provide fuel for the work ahead, which proved well-advised. My buddy decided he would, indeed, begin work on his car while we finished mine. He proceeded in roughly the same order.

Once the original front coilovers were out of the way, we set to work relocating the headlamp-leveling control, monitors the rise and fall of the control arm to keep the headlamps level to the ground. We did this first, as the swaybar links and coilover would be in the way. Removing the old stuff was simple. Ground Control provides an extended link, which replaces the factory one, so that the unit can be mounted higher, since the Ground Control coilovers are shorter than the factory ones. Because things were so tight and so close to the brake lines, Chris did the drilling into the brake line bracket so we could mount the controller there, as the instructions indicated. We had to locate the hole a tad further forward, closer to the brake line, than the diagram suggested so that the box would fit. We also had to fold back the unused upper flange in the wheel well to get it out of the way (see pic, below). Once done, installation was easy.
headlamp sensor area 
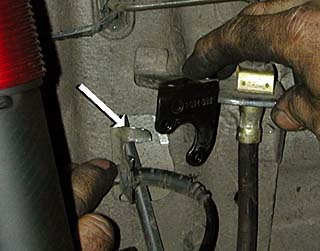
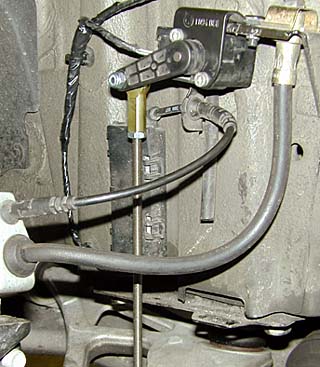
The arrow indicated the flange that had to be flattened to allow the control box to fit properly The black tube beneath is an overflow drain, maybe for the brake fluid. The black wire in the lower part of the bracket is the brake pad sensor. Just to the right of the black bracket is the brake fluid line.
headlamp sensor install The headlamp level sensor in its new home.

I took great joy in using the air-wrench to remove the belly pan screws with a quick zip! I loosened the front swaybar mounts and removed the links, then the bar itself. We then installed the front coilovers, which went smoothly. INstalling the front swaybar wasn't too difficult either, though it was tough trying to get the lower link mount back onto the bar when it slipped off. Don't let that happen, and definitely don't take the bolt out of the link, as the lock washers pop out of place and it's annoying to try to get things threaded again. By this time, I was not into taking pictures. We buttoned things up and prepared for alignment. I took the car for a spin to settle the suspension and get us some pizza. It felt pretty good, though I was trying to avoid any major bumps or hard corners, what with the swaybar being loose.
GC coilovers 
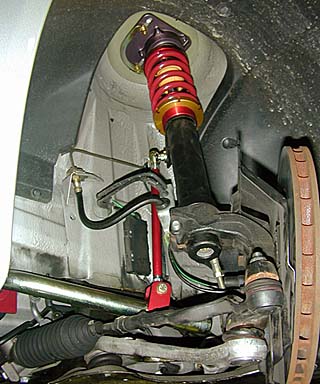
The right front coilover, as seen on my friend's car. Note the swaybar fitting below and inboard of the bottom of the shock; by loosening that collar and sliding the link forward or aft, the bar stiffness can be adjusted.
GC front swaybar 
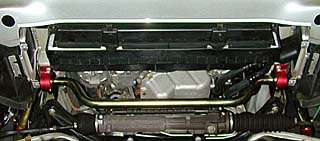
The front swaybar, seen from below on my friend's car.

We then got to the ride-height setting and alignment. By now it was nearing midnight. My friend's car was coming along well. He'd be ready for alignment before mine was finished. We used Ground Control's recommended ride height of 13"e; front and 13.25" rear, as measured from the center of the wheel to the fender lip. We got mine spot on after awhile. This made the car too low for a standard jack to get anywhere under the car, and even too low for the lift. I had to drive it up on blocks to get it on the lift so we could tighten the rear spring perches.

Then the alignment began. I never knew that alignment was such a violent, difficult process. There is no caster adjustment for these cars, nor is there front camber adjustment. The rear camber is set using an elliptical bolt, but it seems to allow for only -2.0° at most, with factory at -1.75° already. The Ground Control camber plates made adjusting camber very easy. Just loosen the three bolts, shove the coilover to the desired setting as indicated by the scale on the top of the plate, and tighten the bolts (to 18 lb-ft). I targeted about -1.5° front camber for street use, with the maximum -2.0° in the rear. With everything else to Ground Control's specs, we made sure the thrust angle was exactly 0.00°. While doing the alignment, we made sure the front and rear swaybars were clear of any obstruction and carrying no load. We noted that, with the driver in place, the right camber went a tad more negative by about a tenth or two of a degree. Finished with my car, we set to work aligning the other car and then headed for home at 5:30 am, bleary-eyed but happy.

Since then, I've driven the car only a little more. It feels great, even loaded to the gills and cruising at 130 mph. It corners almost perfectly flat and feels well-balanced. Even with the very stiff springs, it is not uncomfortable on the street. I'd probably have opted for 600# springs had I had the chance to try it out. My friend has already tinkered with the shock settings, which he says provide an immense range of adjustment, from stiff, to really stiff, to incredibly stiff. I'm very happy with the setup.

A huge, gigantic thanks to Chris of Bauer Porsche Repair for all his help, his facilities, his patience, and his level head. Big thanks too, to Ken for all his help and humor and to Jay of Ground Control for making such nice gear and being as helpful as he could be.


[back to M3 page]   ·   [top of this page]


Copyright © 2002 John Turkel. All rights reserved. Not affiliated or endorsed by BMW AG or BMW North America. All trademarks are the property of their respective holders. This material is for entertainment purposes only.

Last Modified October 2, 2002

http://www.yoy.com/

Visit [an error occurred while processing this directive] since October 2, 2002.